
Tuesday, January 29, 2013
Quilt: Beach Glass - November 2010

Pattern: "Beach Glass" by Penni Albarran
Quilting: Machine quilted by Andrea Gillingham
Binding: Patti Adams
60" x 75"
Simi Valley, CA - November 2010
Tuesday, January 22, 2013
Quilt: Turtle Travels March 2008

I purchased this pattern before my daughter was born, but didn't actually finish the quilt until March 2008. It was fun, but I must have made over twenty visits to the quilt store. Each turtle body has multiple shades in the shell.
Pattern: "Turtle Travels" by Janet Miller
Quilting: Machine quilted by Cindy Matthews
Simi Valley, CA - March 2008

Quilt: Mariner's Compass

Pattern: "Mariner's Compass" by Cindy Matthews
Quilting: Machine quilted in the ditch with clear filament. A simple pattern was machine quilted in the border.
This is my second quilt project and at the time I still didn't know what I was doing. Mistakes abound. I drafted this overly ambitious pattern, thinking that it would be a large quilt with 12 blocks total. I spent more time working on the color selection than sewing. This was my practice quilt using the color technique in Jinny Beyer's great book Color Confidence for Quilters. After finishing one block (at over 8 hours), I decided maybe a pillow would be nice instead of a quilt. Ten years later, the quilt was finished as a four block 50" x 50" wall hanging. Overall a great learning experience. Finished in Simi Valley, CA in 2009.
Quilt: Spinning Stars 2001

This is my very first successful quilt. It was started during a visit to Williamsburg , Virginia
Pattern: "Spinning Stars" by Karen Stone
Quilting: Machine quilted by Cindy Matthews. Quilted in the ditch with clear filament. A simple pattern was machine quilted in the border using gold thread.
58" x 72"
Lafayette Hill, PA 2001
Lafayette Hill, PA 2001


Monday, September 3, 2012
Presto Chango
Change long sleeves into cap sleeves on a knit nightshirt.

 1. Carefully cut the long sleeve from the shirt. There will be a fat, serged seam around the arm hole. Be sure to cut towards the body side so you have a clean edge at the arm hole.


 11. Set in your sleeve. Right sides together, place the sleeve into the arm hole and pin. Match up seems at the arm pit. Note that the serged seam will fold one way. Fold the 1/4 seam allowance the other way. Pin.
12. Match the shoulder seam with the center mark on your sleeve. Pin. Starting at the bottom, pin sleeve all the way around until about an inch from the top on either side. There will be excess sleeve fabric. Don't worry about it yet.


15. Sew in the sleeve. Use a 1/4 inch seam allowance. I start an inch behind the armpit seam. I like to get a running start to get over that little hump.


17. Repeat with other sleeve. Snip loose threads and turn right-side-out.
18. Voila! A capped-sleeve night shirt. Present to your daughter who will say "Gee Mom, I really wanted the sleeves more ruffly than that". Astute observers may note that I only used one long sleeve to make both cap sleeves and that I could have opened up both sleeves, sewn them together and then would have had plenty of fabric to make a nice gather at the shoulder for more ruffled cap sleeves. Please don't tell my daughter.
I hope this tutorial will be helpful to someone (anyone!). It's my first try at an illustrated 'how to' and it actually took me longer to post it than it did to do the alteration.


How I did it:
 1. Carefully cut the long sleeve from the shirt. There will be a fat, serged seam around the arm hole. Be sure to cut towards the body side so you have a clean edge at the arm hole.
2. Keep your finger on the other side, so you can 'feel' where you are cutting. If the fabric bunches up, you can easily cut an unintended gash in the arm hole.

3. You should end up with a nice, clean arm hole.

4. Measure the diameter of the sleeve with a tape measure. This does not have to be perfect.. just a general idea of diameter. In this case, the diameter is about 14 inches (7" x 2). I'll be using a 1/4 inch seam allowance, so I need at least 15 or 16 inches of sleeve material. A little more is okay, as you will see when we set in the sleeve.
5. Measure the sleeve, so you know what you have to work with. Fold the sleeve as shown. Measure across the bottom of the sleeve, from the fold to the end of the curved part. This is approximately 9 inches, so when it is opened, I will have 18 inches of length. This is more than the 16 inches I estimated above, and that is enough. (Plan B would be to make the sleeves out of different fabric)

 7. Unfold and you will have an oblong piece of fabric that is about 8 inches wide and 18 inches long. Cut in half to yield two pieces that look like this.
 8. Sew a rolled edge on the curved part of each sleeve. To make this easier, I used wash-away spray stabilizer. I covered all but 1/8th inch of the curved edge with paper and gave the exposed edge a quick spray. You can just sew and fold as you go, if you don't have any stabilizer. It will take you longer, but it will work. For curves, I fold both ways into the curve to help keep it smoother.
 9. If you have a hidden hem foot, use this to help you keep the edge of the hem in just the right place. You can do this without a special foot, but I'm really not that steady-handed, so I have to use all the tricks I can.

6. Cut the sleeve as noted by the black line. It is about 4 inches wide.
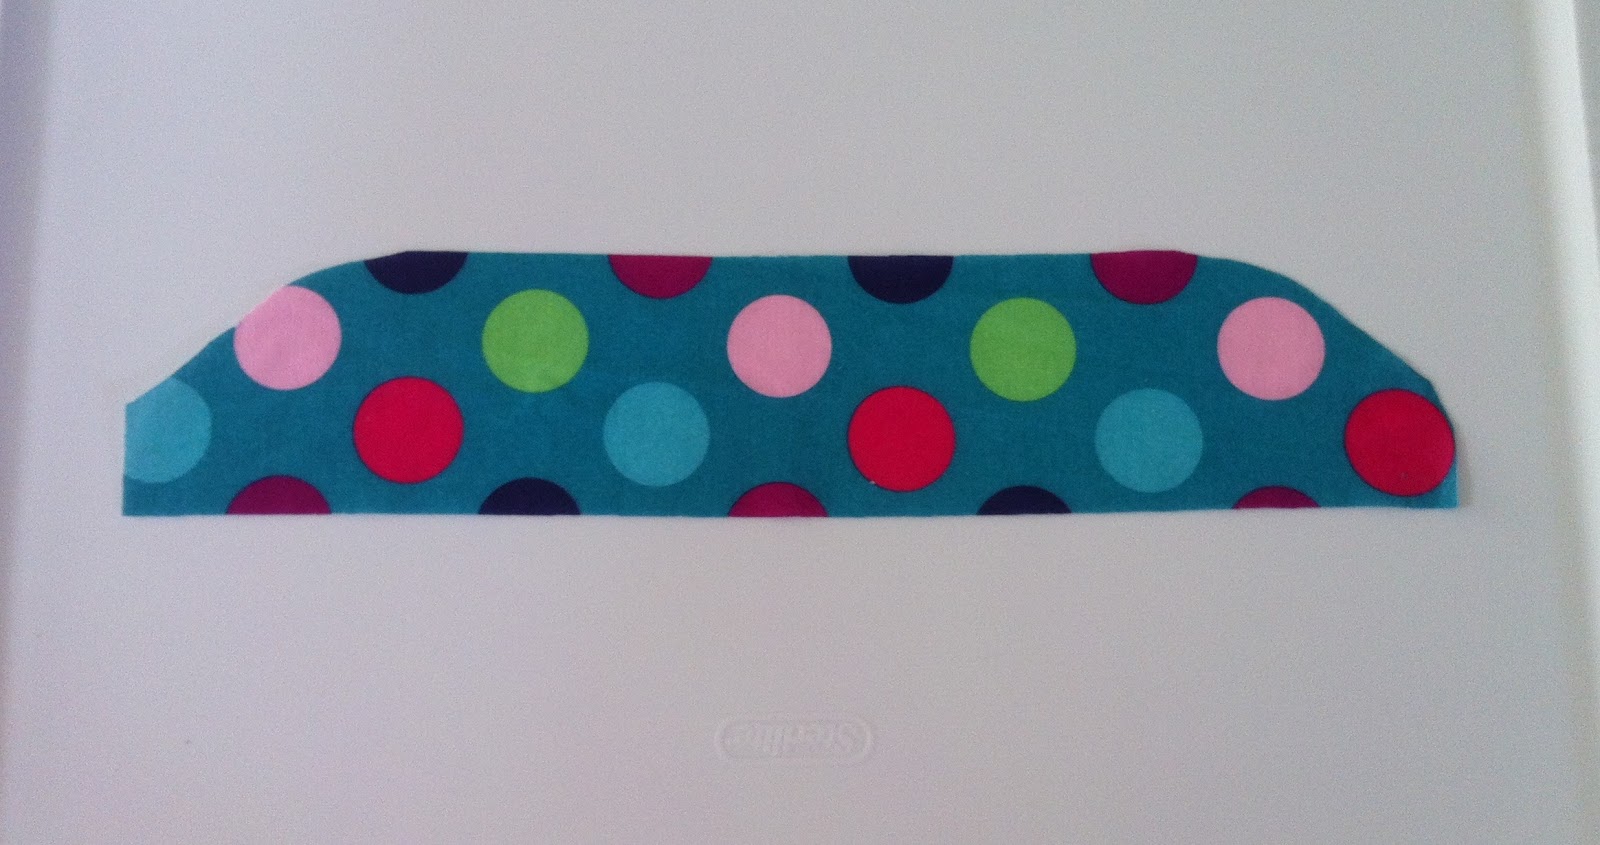 7. Unfold and you will have an oblong piece of fabric that is about 8 inches wide and 18 inches long. Cut in half to yield two pieces that look like this.
 8. Sew a rolled edge on the curved part of each sleeve. To make this easier, I used wash-away spray stabilizer. I covered all but 1/8th inch of the curved edge with paper and gave the exposed edge a quick spray. You can just sew and fold as you go, if you don't have any stabilizer. It will take you longer, but it will work. For curves, I fold both ways into the curve to help keep it smoother.
  9. If you have a hidden hem foot, use this to help you keep the edge of the hem in just the right place. You can do this without a special foot, but I'm really not that steady-handed, so I have to use all the tricks I can.
10. With right-sides together, sew the sleeve together at the small ends, using a 1/4 inch seam allowance. Mark the center of the sleeve (this will be used to match up with the shoulder seam).
 11. Set in your sleeve. Right sides together, place the sleeve into the arm hole and pin. Match up seems at the arm pit. Note that the serged seam will fold one way. Fold the 1/4 seam allowance the other way. Pin.
12. Match the shoulder seam with the center mark on your sleeve. Pin. Starting at the bottom, pin sleeve all the way around until about an inch from the top on either side. There will be excess sleeve fabric. Don't worry about it yet.
13. When you get to the top, you may have a little excess.

14. Make a little pleat right at the top shoulder seam and pin. This is the completely pinned sleeve.

15. Sew in the sleeve. Use a 1/4 inch seam allowance. I start an inch behind the armpit seam. I like to get a running start to get over that little hump.

16. Be sure to keep your fabric straight. Knits like to roll up. I keep my fingers under the edge to make sure they are straight in the right place.

17. Repeat with other sleeve. Snip loose threads and turn right-side-out.
18. Voila! A capped-sleeve night shirt. Present to your daughter who will say "Gee Mom, I really wanted the sleeves more ruffly than that". Astute observers may note that I only used one long sleeve to make both cap sleeves and that I could have opened up both sleeves, sewn them together and then would have had plenty of fabric to make a nice gather at the shoulder for more ruffled cap sleeves. Please don't tell my daughter.
I hope this tutorial will be helpful to someone (anyone!). It's my first try at an illustrated 'how to' and it actually took me longer to post it than it did to do the alteration.

Subscribe to:
Posts (Atom)